Posts tagged tutorial
F# is a amazing functional language bridging C#/.NET ecosystem with OCaml and interactive programming. It has recently became by favorite language to create personal projects in. It both has additional security of strong typing, unlike Python or Ruby while keeping the functional and interactive properties of weak-typed languages. F# is truly a engineering marvel.
PowerShell 7 is the Open-Source implementation of the old Windows PowerShell that is also cross-platform and can be used for scripting and automation. It’s Object-orientation makes an amazing extension capability compared to Bash.
You can use the F# language to create PowerShell modules. Normally PS Modules are written in C# but since the interop between .NET languages is insanely fluent one can just swap C# for F#.
Creating new project
|
|
mkdir -p ~/source/temporary/powershell-modules/fs-example
cd ~/source/temporary/powershell-modules/fs-example
|
Dotnet ClassLib
Init new F# Class project:
|
|
dotnet new classlib --language "F#"
|
Dependencies
Add dependency on Powershell interaction library:
|
|
dotnet add package PowerShellStandard.Library --version 5.1.1
|
F# interaction with PowerShell
Let’s rewrite Library.fs to contain:
1
2
3
4
5
6
7
8
9
10
11
12
13
14 |
namespace FsExample.PowerShell
open System.Management.Automation
[<Cmdlet(VerbsCommon.Format, "FsExample")>]
type FsExample() =
inherit PSCmdlet()
[<Parameter>]
[<ValidateNotNullOrEmpty>]
member val Name: string = "Me" with get, set
override this.BeginProcessing() =
printfn "Hello %s" this.Name
|
Then, change RootNamespace to the main module name, that is FsExample.PowerShell.
We need to copy all assemblies to output. Add <CopyLocalLockFileAssemblies>true</CopyLocalLockFileAssemblies>:
1
2
3
4
5
6
7
8
9
10
11
12
13 |
<Project Sdk="Microsoft.NET.Sdk">
<PropertyGroup>
<TargetFramework>net9.0</TargetFramework>
<RootNamespace>FsExample.PowerShell</RootNamespace>
<GenerateDocumentationFile>true</GenerateDocumentationFile>
<CopyLocalLockFileAssemblies>true</CopyLocalLockFileAssemblies>
</PropertyGroup>
<!-- Snip ... -->
</Project>
|
PowerShell library
Create PSModuleAssets directory:
|
|
mkdir -p PSModuleAssets
cd PSModuleAssets
|
The main module file will in turn load the DLL compiled form above F# code.
Create main module file - fs-example.psm1:
|
|
#!/usr/bin/env -S pwsh -NoLogo -NoProfile -NonInteractive
Import-Module "$PSScriptRoot/fs-example.dll"
|
We then need to create the main manifest file fs-example.psd1.
Path - relative path to output the manifest,RootModule - relative module path to load on module import,ModuleVersion, Description, Author and Copyright are some of standard metadata fields,AliasesToExport, CmdletsToExport, DscResourcesToExport, FunctionsToExport and VariablesToExport are either globs or lists that tell what functions will be available on module load, for simplicity we will just specify a glob expression '*'.
|
|
New-ModuleManifest -Path ./fs-example.psd1 -RootModule ./fs-example.psm1 `
-ModuleVersion "1.0.0" `
-Description "FSharp example module" `
-Author "Me" -Copyright "Copyright (c) 2025, Me" `
-AliasesToExport '*' -CmdletsToExport '*' `
-DscResourcesToExport '*' -FunctionsToExport '*' -VariablesToExport '*'
|
Copying PowerShell assets
Following ItemGroup will copy all files from PSModuleAssets to the output directory:
 1
 2
 3
 4
 5
 6
 7
 8
 9
10
11
12
13
14 |
<Project Sdk="Microsoft.NET.Sdk">
<!-- Snip ... -->
<ItemGroup>
<None Include="PSModuleAssets/*.*">
<Link>%(Filename)%(Extension)</Link>
<CopyToOutputDirectory>Always</CopyToOutputDirectory>
</None>
</ItemGroup>
<!-- Snip ... -->
</Project>
|
Building the F# module
Clean up the old builds:
|
|
rm -fr ./psrepository
rm -fr ./out-module/fs-example
|
Dotnet-Build
And then build the module:
|
|
dotnet restore
dotnet build --configuration Release --output ./out-module/fs-example
|
Language locality bug
You have to use the en-US locale when publishing PowerShell modules.
|
|
$env:LANG = "en_US.UTF-8"
$env:LANGUAGE = "en_US.UTF-8"
$env:LC_MESSAGES = "en_US.utf8"
|
Installation
Remove old registered PowerShell repository:
|
|
try { Unregister-PSRepository -Name fs-example } catch { }
|
Register-PSRepository and Publish-Module
This quite complicated script will:
- set up a PowerShell repository in current location,
- register the PowerShell repository,
- publish the module into the PowerShell repository,
- install that published module from the PowerShell repository.
|
|
$repo = "fs-example"
$repoPath = "$pwd/psrepository/fs-example"
New-Item -ItemType Directory -Path $repoPath | Out-Null
Register-PSRepository -InstallationPolicy Trusted -Name $repo -SourceLocation $repoPath
Publish-Module -Verbose -Path $pwd/out-module/fs-example -Repository $repo
Install-Module -Scope CurrentUser -Force -Verbose -Name fs-example -Repository $repo
|
Removal
Uninstall-Module
Just call Uninstall-Module to remove any PowerShell module.
|
|
Uninstall-Module -Name fs-example
|
Usage in the REPL
Import-Module
Import it with Import-Module.
|
|
Import-Module -Verbose fs-example -Force
|
Remember the above F# function that was defined in the class?
|
|
[<Cmdlet(VerbsCommon.Format, "FsExample")>]
type FsExample()
|
It will be now available under the name composed of the “common verb” and a secondary part, so Format-FsExample.
Try it:
|
|
Format-FsExample -Name Maciej
|
How it works
- There will be a FUSE OneDrive filesystem mounted on the machine Nextcloud runs on,
- You configure filesystem-local “External storage” and point to the mountpoint of a cloud drive (in this case OneDrive),
- users connected via Nextcloud Client will have a option to sync any chosen files from the External storage as if they were Nextcloud-owned files.
Benefits
There are some benefits from connecting OneDrive to Nextcloud:
- faster cached sync than by normal straight-to OneDrive connection - files will be pushed to Nextcloud and then uploaded to Nextcloud, this will take less time than uploading straight to OneDrive because of Microsoft OneDrive rate-limiting the uploads (especially in case of larger files),
- clients of Nextcloud do not have to configure any OneDrive connection,
- you will be able to have two-way sync of your OneDrive files (currently two-way sync on the RClone side is experimental, this will use Nextcloud’s two-way sync mechanism).
Set up RClone
First You will have to set up RClone. Connect to your cloud of choice and then copy the config to a location that will be readable by a service that mounts a given cloud drive.
For OneDrive I use /usr/local/share/rclone/config/rclone.conf that is accessible only to the apache user.
The config will look something like this:
|
|
[OneDrive]
type = onedrive
region = global
token = *REDACTED*
drive_id = *REDACTED*
drive_type = personal
|
Mounting OneDrive
I created this helper script (in /usr/local/bin/rclone-mount.sh):
 1
 2
 3
 4
 5
 6
 7
 8
 9
10
11
12
13
14
15
16
17
18
19
20
21
22
23
24
25
26
27
28
29
30
31
32 |
#!/bin/sh
set -e
set -u
trap "exit 130" INT
conf_path="${1}"
local_user="${2}"
local_path="${3}"
cloud_name="${4}"
cloud_path="${5}"
log_dir="/var/log/rclone"
log_file="${log_dir}/rclone-mount-${local_user}-${cloud_name}.log"
mkdir -p "${log_dir}"
touch "${log_file}"
chmod a+r "${log_file}"
chown "${local_user}" "${log_file}"
exec rclone \
--default-permissions \
--allow-other \
--verbose \
--vfs-cache-mode full \
--config "${conf_path}" \
mount \
"${cloud_name}:${cloud_path}" "${local_path}" \
>> "${log_file}" 2>&1
|
Then, I use it in a OpenRC service like this (/etc/init.d/mount-OneDrive):
1
2
3
4
5
6
7
8
9
10
11
12
13
14
15
16
17
18
19
20
21
22
23
24
25
26
27
28
29
30
31
32 |
#!/sbin/openrc-run
conf_path="/usr/local/share/rclone/config/rclone.conf"
cloud_name="OneDrive"
cloud_path="/"
local_user="apache"
local_path="/mnt/${cloud_name}"
command="/usr/local/bin/rclone-mount.sh"
command_args="${conf_path} ${local_user} ${local_path} ${cloud_name} ${cloud_path}"
command_background="false"
command_user="${local_user}:$(id -g -n ${local_user})"
supervisor="supervise-daemon"
depend() {
need net
}
start_pre() {
ebegin "Unmounting leftovers from ${local_path} before service start"
umount "${local_path}"
eend 0
}
stop_post() {
ebegin "Unmounting leftovers from ${local_path} after service stop"
umount "${local_path}"
eend 0
}
|
Enabling the RClone service
Set up directories and correct permissions:
|
|
mkdir -p /usr/local/share/rclone/config
chown -R apache:apache /usr/local/share/rclone/config
mkdir -p /var/log/rclone
chown -R apache:apache /var/log/rclone
|
Do not forget to make the mount service script executable:
|
|
chmod +x /etc/init.d/mount-OneDrive
|
Enable and start this service on OpenRC:
|
|
rc-update add mount-OneDrive default
rc-service mount-OneDrive start
|
Drive permissions
RClone mounts cloud drives by using FUSE. To have the RClone option --allow-other available in order to allow root to access the drive you will have to modify the FUSE config file (/etc/fuse.conf) - add user_allow_other.
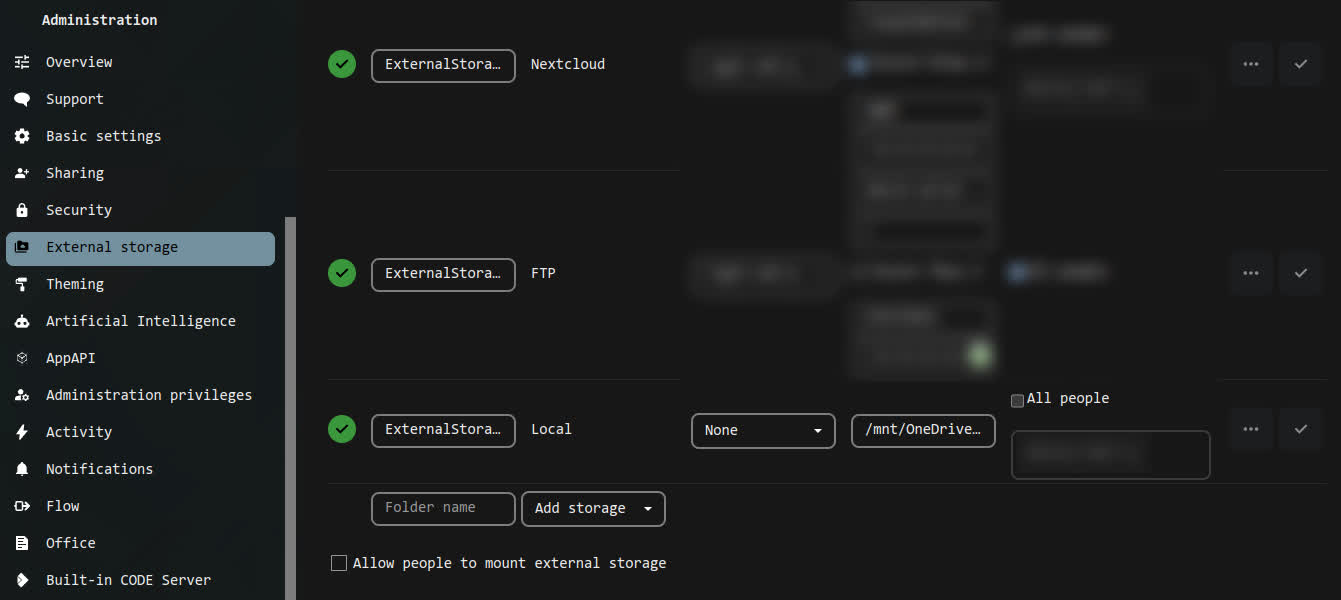
Nextcloud configuration
Download and enable the “External storage” app. Then, in “Administration” settings add a external storage:
- name:
ExternalStorage_OneDrive
- type:
Local
- authentication:
None
- configuration:
/mnt/OneDrive
- available for: YOUR USER
The official ::gentoo repository currently contains only GHC on version 9.2.8. To install newer GHC one has to either download/build themselves or use the ::haskell overlay (https://github.com/gentoo-haskell/gentoo-haskell).
Enable the ::haskell overlay
Enable:
|
|
eselect repository enable haskell
|
Sync:
|
|
emerge --sync haskell
egencache --update --repo haskell --jobs 12 --load 6
eix-update
|
Unmask needed packages
Add to /etc/portage/package.unmask/0000_hs.conf
|
|
<dev-lang/ghc-9.9
<dev-haskell/cabal-3.11
<dev-haskell/cabal-install-3.11
<dev-haskell/cabal-install-solver-3.11
<dev-haskell/cabal-syntax-3.11
<dev-haskell/text-2.2
<dev-haskell/parsec-3.1.18
|
Add to /etc/portage/package.accept_keywords/0000_hs.conf
|
|
app-admin/haskell-updater
dev-haskell/*
dev-lang/ghc
|
Install
|
|
emerge --ask --verbose ">=dev-lang/ghc-9.8" ">=dev-haskell/cabal-install-3.10"
|
Build of GHC 9.8 takes around ~2 hours on a 8-core laptop-grade CPU.
Bonus: masking packages from ::haskell
If you want to exclude a given version from the ::haskell overly from being installed/updated, then you can add a similar line(s) to /etc/portage/package.mask/0000_hs.conf:
|
|
app-emacs/haskell-mode::haskell
|
Nix is useful for quickly testing out software and providing a strict environment that can be shared between people.
Today I’m trying out Nix again, this time I want to do it my way.
Installation process
Nix store
I know Nix needs “Nix store” installation on / (the system root).
Create it manually to prevent the installation script from calling sudo. 1st I switch to the root account, and then I run:
|
|
mkdir -p -m 0755 /nix
chown -R xy:xy /nix
|
Running the install script
Download the Nix install script and examine the contents.
|
|
curl -L https://nixos.org/nix/install > nix_install.sh
|
Then, run it with --no-daemon to prevent it running as system service.
|
|
sh ./nix_install.sh --no-daemon
|
performing a single-user installation of Nix...
copying Nix to /nix/store...
installing 'nix-2.20.1'
building '/nix/store/1ahlg3bviy174d6ig1gn393c23sqlki6-user-environment.drv'...
unpacking channels...
modifying /home/xy/.bash_profile...
modifying /home/xy/.zshenv...
placing /home/xy/.config/fish/conf.d/nix.fish...
Installation finished! To ensure that the necessary environment
variables are set, either log in again, or type
. /home/xy/.nix-profile/etc/profile.d/nix.fish
in your shell.
Wait!
modifying /home/xy/.bash_profile...
modifying /home/xy/.zshenv...
placing /home/xy/.config/fish/conf.d/nix.fish...
That’s very rude!
Stopping Nix from making a mess
I need to prevent Nix from mess up with my environment when I do not want it to. Nix puts some code into the Bash, ZSH and Fish initialization files during installation to ease it’s use. I do not want that since I do not want Nix to meddle with my environment without me knowing it.
I keep my .bash_profile and .zshenv in a stow-managed git repo so I can just cd into my repo and do git reset --hard, but for you will have to revert those files to their old forms manually.
Playing with Nix
We do not have nix in PATH but we still can launch it. Nix executables are located inside ~/.nix-profile/bin/.
By invoking nix-shell one can create a ephemeral environment containing only packages specified after the -p flag. I always add -p nix to have the Nix tools available also inside the spawned environment.
I will test out chibi (small Scheme interpreter) + rlwrap (REPL support for software lacking it) inside a Nix ephemeral environment:
|
|
~/.nix-profile/bin/nix-shell -p nix chibi rlwrap
|
Inside the spawned shell:
In the chibi REPL, let’s see the contents of the PATH environment variable:
|
|
(get-environment-variable "PATH")
|
And exit the Scheme REPL:
After the playtime, run garbage collection:
|
|
~/.nix-profile/bin/nix-collect-garbage
|
Racket executables made by raco exe are known to be quite large. One of tools that can be used to help reduce the size of produced binaries is the gzexe program.
gzexe is a tool that can compress a executable binary. It can be acquired by installing gzip on most Linux distributions (included in the app-arch/gzip package on Gentoo).
Creating a hello-world executable with Racket
Write following contents to hello-world.rkt file:
To make a binary run:
|
|
raco exe --orig-exe -v -o hello-world hello-world.rkt
|
The file hello-world will be produced.
This is what file hello-world says about it:
|
|
hello-world: ELF 64-bit LSB pie executable, x86-64, version 1 (SYSV),
dynamically linked, interpreter /lib64/ld-linux-x86-64.so.2,
for GNU/Linux 3.2.0, stripped
|
This “small” executable weights 46 MB!
In comparison busybox weights around 2 MB.
Compressing with gzexe
Keep in mind that gzexe will overwrite the compressed file and create a backup with appended "~".
And this gives us only 8,5 MB. Nice!
In comparison bazel, which is a single-binary build system written in JAVA, executable takes 33 MB on my Gentoo machine. I tried compressing it with gzexe and it reduces it only by 10%, to around 29 MB.
gzexeis not a silver bullet but with Racket exes it works very nicely.
I really wanted to look into the new kernel building solutions for Gentoo and maybe migrate to dracut, but last time I tried, ~1.5 years ago, the initreamfs was now working for me.
And now in 2023 I’m still running genkernel for my personal boxes as well as other servers running Gentoo.
I guess some short term solutions really become defined tools :P
So this is how I rebuild my kernel nowadays:
-
Copy old config
|
|
cd /usr/src
cp linux-6.1.38-gentoo/.config linux-6.1.41-gentoo/
|
-
Remove old kernel build directories
|
|
rm -r linux-6.1.31-gentoo
|
-
Run initial preparation
|
|
( eselect kernel set 1 && cd /usr/src/linux && make olddefconfig )
|
-
Call genkernel
1
2
3
4
5
6
7
8
9
10
11
12 |
genkernel \
--no-menuconfig \
--no-clean \
--no-clear-cachedir \
--no-cleanup \
--no-mrproper \
--lvm \
--luks \
--mdadm \
--nfs \
--kernel-localversion="-$(hostname)-$(date '+%Y.%m.%d')" \
all
|
-
Rebuild the modules
If in your /etc/genkernel.conf you have MODULEREBUILD turned off, then also call emerge:
|
|
emerge -1 @module-rebuild
|
Constructing debugging syntax
I wanted to echo parameter values when I set them in my blog’s frog.rkt config file.
Nothing simpler in Racket!
First I create this macro for echoing a single parameter value when it is set:
1
2
3
4
5
6
7
8
9
10
11
12 |
(define-syntax-rule (verbose-set-parameter parameter-id parameter-value)
(begin
;; Set the parameter.
(parameter-id parameter-value)
;; Then call the parameter and print it's value.
;; The "'parameter-id" is special syntax
;; for turning a "parameter-id" identifier to a symbol.
;; We can also write it like:
;; > (quote parameter-id)
;; to be less confusing.
(printf "[DEBUG] (~a ~v)\n" 'parameter-id (parameter-id))))
|
then, I create a wrapper for above macro that can take multiple parameter pairs:
|
|
(define-syntax-rule (verbose-set-parameters (parameter-id parameter-value) ...)
(begin
;; Unpack a chain of "(parameter-id parameter-value)" pairs
;; using the "..." syntax.
(verbose-set-parameter parameter-id parameter-value) ...))
|
Using the macro
Afterwards we can call it like so:
|
|
(verbose-set-parameters
(current-title "XGQT's blog")
(current-author "Maciej Barć"))
|
Notice that even the form of setting a parameter, that is (parameter-procedure "value"), remains the same, but in reality it is just similar to how the syntax macro pattern-matches on it.
Inspecting macro expansion
In racket-mode inside GNU Emacs we can inspect the macro expansion with racket-expand-region. Stepping through the expansion provided this result:
|
|
(begin
(begin
(current-title "XGQT's blog")
(printf "[DEBUG] (~a ~v)\n" 'current-title (current-title)))
(begin
(current-author "Maciej Barć")
(printf "[DEBUG] (~a ~v)\n" 'current-author (current-author))))
|
Equality methods
By implementing a method for equality equal-to? and two extraction methods equal-hash-code-of and equal-secondary-hash-code-of we can define our own object comparison rules.
For more info see Object Equality and Hashing.
Consider the following example:
 1
 2
 3
 4
 5
 6
 7
 8
 9
10
11
12
13
14 |
|
If we create a new integer% object we can notice that it is not transparent (we can not inspect values of any of it’s fields).
|
|
(new integer%)
;; => (object:integer% ...)
|
But if we compare two fresh integer% objects they will be equal.
Transparent class
A transparent cvlass is a class with the inspect expression valuye se to #false.
From Racket documentation Creating Classes:
Just as for structure types, an inspector controls access to the class’s fields, including private fields, and also affects comparisons using equal?.
Consider the following example:
If we create a new integer% object we can see it’s field values.
|
|
(new integer%)
;; => (object:integer% 0)
|
And if we compare two fresh integer% objects they will be equal.
Config
First let’s prepare a suitable nginx configuration file.
This one is pretty bare but it works well for our case:
1
2
3
4
5
6
7
8
9
10
11
12
13
14
15
16
17
18
19
20
21
22
23
24
25
26
27
28
29
30
31 |
worker_processes 1;
daemon off;
pid ./nginx/temp/nginx.pid;

error_log /dev/stdout info;

events {
    worker_connections 1024;
}

http {
    client_body_temp_path ./nginx/temp/client 1 2;
    proxy_temp_path ./nginx/temp/proxy;
    fastcgi_temp_path ./nginx/temp/fastcgi;
    uwsgi_temp_path ./nginx/temp/uwsgi;
    scgi_temp_path ./nginx/temp/scgi;

    server {
        listen 127.0.0.1:8080;
        server_name localhost;

        access_log /dev/stdout;
        error_log /dev/stdout info;

        root ./;

        location / {
            autoindex on;
        }
    }
}
|
Server config is set up for serving all static files from the current directory.
Startup
Preparation
Based on how you want to store _temp_path files it might be necessary to create (or clean up) additional directories, for example:
|
|
rm -r ./nginx/temp
mkdir -p ./nginx/temp
|
Run in current directory
|
|
nginx -c ./nginx.conf -p ./
|
BTW, you may want to replace ./ with "$(pwd)" and occurrences in the config with static paths.
Bonus: other simple servers
Some of no-dependency-except-itself http servers it’s good to know about:
Python http.server
|
|
python3 -m http.server -b 127.0.0.1 8080
|
Busybox
|
|
busybox httpd -f -p 127.0.0.1:8080 -v
|
You can read more about configuring busybox’s httpd on OpenWRT docs.
User-mode
By default you would probably have something like this, the user-mode network:
|
|
<interface type="user">
  <mac address="00:00:00:00:00:00"/>
  <model type="virtio"/>
  <address type="pci" domain="0x0000" bus="0x01" slot="0x00" function="0x0"/>
</interface>
|
Bridge
Bridges can be easily created using the NetworkManager’s TUI tool called nmtui.
Bridge XML configuration for Libvirt
|
|
<interface type="bridge">
  <mac address="00:00:00:00:00:00"/>
  <source bridge="br1"/>
  <target dev="vnet2"/>
  <model type="virtio"/>
  <alias name="net0"/>
  <address type="pci" domain="0x0000" bus="0x06" slot="0x00" function="0x0"/>
</interface>
|
Sysctl options
Be sure the following options are enabled (1):
net.ipv4.ip_forwardnet.ipv4.conf.all.send_redirects
and the following options are disabled (0):
net.bridge.bridge-nf-call-iptables
Patching
The file lit.site.cfg has to be inspected for any incorrect calls to executables. For example see src_prepare function form dev-lang/boogie.
Eclasses
Because we will need to specify how many threads should lit run we need to inherit multiprocessing to detect how many parallel jobs the portage config sets.
Dependencies
Ensure that dev-python/lit is in BDEPEND, but also additional packages may be needed, for example dev-python/OutputCheck.
|
|
BDEPEND="
    ${RDEPEND}
    test? (
        dev-python/lit
        dev-python/OutputCheck
    )
"
|
Bad tests
To deal with bad test you can simply remove the files causing the failures.
|
|
local -a bad_tests=(
    civl/inductive-sequentialization/BroadcastConsensus.bpl
    civl/inductive-sequentialization/PingPong.bpl
    livevars/bla1.bpl
)
local bad_test
for bad_test in ${bad_tests[@]} ; do
    rm "${S}"/Test/${bad_test} || die
done
|
Test phase
--threads $(makeopts_jobs) specifies how many parallel tests to run.
--verbose option will show output of failed tests.
Last lit argument specifies where lit should look for lit.site.cfg and tests.
|
|
src_test() {
    lit --threads $(makeopts_jobs) --verbose "${S}"/Test || die
}
|
Portage
Configure the following for Portage.
Emerge
Emerge the following packages:
app-emacs/company-ebuilddev-util/pkgcheck
Company-Ebuild should pull in app-emacs/ebuild-mode, if that does not happen, then report a bug ;-D
Standard
Add the following to your user's Emacs initialization file. The initialization file is either ~/.emacs.d/init.el or ~/.config/emacs/init.el for newer versions of GNU Emacs.
|
|
(require 'ebuild-mode)
(require 'company-ebuild)
(require 'flycheck)
(require 'flycheck-pkgcheck)

(add-hook 'ebuild-mode-hook 'company-ebuild-setup)
(add-hook 'ebuild-mode-hook 'flycheck-mode)
(add-hook 'ebuild-mode-hook 'flycheck-pkgcheck-setup)
|
Use-Package
We can also configure our environment using a use-package macro that simplifies the setup a little bit.
To use the below configuration the app-emacs/use-package package will have to be installed.
|
|
(require 'use-package)

(use-package ebuild-mode
  :defer t
  :mode "\\.\\(ebuild\\|eclass\\)\\'"
  :hook
  ((ebuild-mode . company-ebuild-setup)
   (ebuild-mode . flycheck-mode)
   (ebuild-mode . flycheck-pkgcheck-setup)))
|
The :defer t and :mode "..." enable deferred loading which theoretically speeds up GNU Emacs initialization time at the cost of running the whole use-package block of ebuild-mode configuration when the :mode condition is met.