There will be a FUSE OneDrive filesystem mounted on the machine Nextcloud runs on,
You configure filesystem-local “External storage” and point to the mountpoint of a cloud drive (in this case OneDrive),
users connected via Nextcloud Client will have a option to sync any chosen files from the External storage as if they were Nextcloud-owned files.
Benefits
There are some benefits from connecting OneDrive to Nextcloud:
faster cached sync than by normal straight-to OneDrive connection - files will be pushed to Nextcloud and then uploaded to Nextcloud, this will take less time than uploading straight to OneDrive because of Microsoft OneDrive rate-limiting the uploads (especially in case of larger files),
clients of Nextcloud do not have to configure any OneDrive connection,
you will be able to have two-way sync of your OneDrive files (currently two-way sync on the RClone side is experimental, this will use Nextcloud’s two-way sync mechanism).
Set up RClone
First You will have to set up RClone. Connect to your cloud of choice and then copy the config to a location that will be readable by a service that mounts a given cloud drive.
For OneDrive I use /usr/local/share/rclone/config/rclone.conf that is accessible only to the apache user.
The config will look something like this:
123456
[OneDrive]
type = onedrive
region = global
token = *REDACTED*
drive_id = *REDACTED*
drive_type = personal
Mounting OneDrive
I created this helper script (in /usr/local/bin/rclone-mount.sh):
#!/sbin/openrc-runconf_path="/usr/local/share/rclone/config/rclone.conf"cloud_name="OneDrive"cloud_path="/"local_user="apache"local_path="/mnt/${cloud_name}"command="/usr/local/bin/rclone-mount.sh"command_args="${conf_path}${local_user}${local_path}${cloud_name}${cloud_path}"command_background="false"command_user="${local_user}:$(id-g-n${local_user})"supervisor="supervise-daemon"
depend(){neednet
}
start_pre(){ebegin"Unmounting leftovers from ${local_path} before service start"umount"${local_path}"eend0}
stop_post(){ebegin"Unmounting leftovers from ${local_path} after service stop"umount"${local_path}"eend0}
RClone mounts cloud drives by using FUSE. To have the RClone option --allow-other available in order to allow root to access the drive you will have to modify the FUSE config file (/etc/fuse.conf) - add user_allow_other.
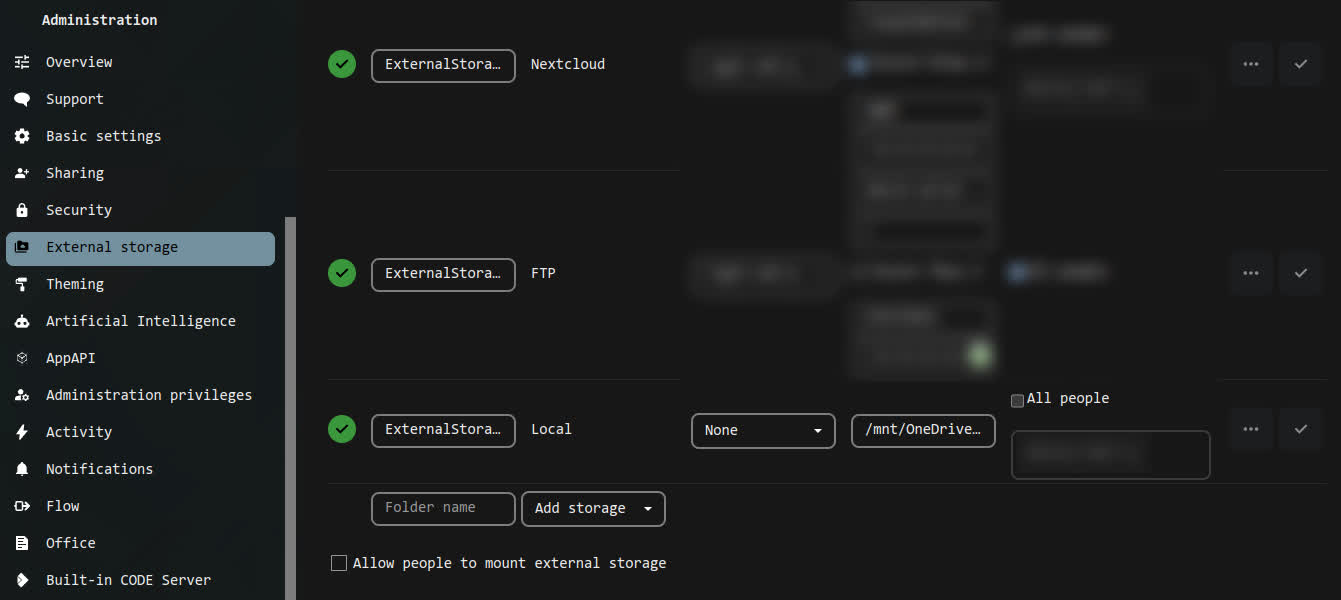
Nextcloud configuration
Download and enable the “External storage” app. Then, in “Administration” settings add a external storage:
By default (on Gentoo): * sa (the collector) saves statistics to /var/log/sa, * /etc/sysstat is the configuration file * cron jobs are run via the *system* cronjob table.
I made a mistake when splitting my Portage make.conf file, having it as one file instead of a directly with many small files is a lot easier to maintain.
Portage allows users to split all of files inside /etc/portage such as make.conf, package.use, package.mask and other into groups of files contained in directories of the same name. This is very helpful when using automation to add some wanted configuration. But in case of make.conf it becomes a “form over function” issue.
I would also recommend to keep make.conf as simple as possible, without useless overrides and variable reassignment.
Then, run it with --no-daemon to prevent it running as system service.
1
sh./nix_install.sh--no-daemon
performing a single-user installation of Nix...
copying Nix to /nix/store...
installing 'nix-2.20.1'
building '/nix/store/1ahlg3bviy174d6ig1gn393c23sqlki6-user-environment.drv'...
unpacking channels...
modifying /home/xy/.bash_profile...
modifying /home/xy/.zshenv...
placing /home/xy/.config/fish/conf.d/nix.fish...

Installation finished!  To ensure that the necessary environment
variables are set, either log in again, or type

. /home/xy/.nix-profile/etc/profile.d/nix.fish

in your shell.
I need to prevent Nix from mess up with my environment when I do not want it to. Nix puts some code into the Bash, ZSH and Fish initialization files during installation to ease it’s use. I do not want that since I do not want Nix to meddle with my environment without me knowing it.
I keep my .bash_profile and .zshenv in a stow-managed git repo so I can just cd into my repo and do git reset --hard, but for you will have to revert those files to their old forms manually.
Playing with Nix
We do not have nix in PATH but we still can launch it. Nix executables are located inside ~/.nix-profile/bin/.
By invoking nix-shell one can create a ephemeral environment containing only packages specified after the -p flag. I always add -p nix to have the Nix tools available also inside the spawned environment.
I will test out chibi (small Scheme interpreter) + rlwrap (REPL support for software lacking it) inside a Nix ephemeral environment:
1
~/.nix-profile/bin/nix-shell-pnixchibirlwrap
Inside the spawned shell:
1
rlwrapchibi-scheme
In the chibi REPL, let’s see the contents of the PATH environment variable:
The Gentoo Dotnet project introduced better support for building .NET-based software using the nuget, dotnet-pkg-base and dotnet-pkg eclasses. This opened new opportunities of bringing new packages depending on .NET ecosystem to the official Gentoo ebuild repository and helping developers that use dotnet-sdk on Gentoo.
New software requiring .NET is constantly being added to the main Gentoo tree, among others that is:
many packages aimed straight at developing .NET projects.
Dotnet project is also looking for new maintainers and users who are willing to help out here and there. Current state of .NET in Gentoo is very good but we can still do a lot better.
I really wanted to look into the new kernel building solutions for Gentoo and maybe migrate to dracut, but last time I tried, ~1.5 years ago, the initreamfs was now working for me.
And now in 2023 I’m still running genkernel for my personal boxes as well as other servers running Gentoo.
I guess some short term solutions really become defined tools :P
As a part of my work of modernizing the way .NET SDK packages are distributed in Gentoo I delved into packaging a from-source build of PowerShell for Gentoo using the dotnet-pkg eclass.
Packaging pwsh was a little tricky but I got a lot of help from reading the Alpine Linux’s APKBUILD. I had to generate special C# code bindings with ResGen and repackage the PowerShell tarball. Other than this trick, restoring and building PowerShell was pretty straight forward with the NuGet package management support from the dotnet-pkg.eclass.
Alternatively if you do not want to build PowerShell you can install the binary package, I have in plans to keep that package around even after we get the non-binary app-shells/pwsh into the official Gentoo ebuild repository.
Why install modules via Portage?
But why stop on PowerShell when we can also package multiple PS modules?
Installing modules via Portage has many benefits:
better version control,
more control over global install,
no need to enable PS Gallery,
sandboxed builds,
using system .NET runtime.
Merging the modules
PowerShell’s method of finding modules is at follows: check paths from the PSModulePath environment variable for directories containing valid .psd1 files which define the PS modules.
system modules directory in /usr/local — /usr/local/share/powershell/Modules
Modules directory inside the pwsh home — for example /usr/share/pwsh-7.3/Modules
Because we do not want to touch either /usr/local nor pwsh home, we embed a special environment variable inside the pwsh launcher script to extend the path where pwsh looks for PS modules. The new module directory is located at /usr/share/GentooPowerShell/Modules.
So every PowerShell module will install it’s files inside /usr/share/GentooPowerShell/Modules.
To follow PS module location convention we add to that path a segment for the real module name and a segment for module version. This also enables us to have proper multi-slotting because most of the time the modules will not block installing other versions.
And that is it. Some packages do not even need to be compiled, they just need files placed into specific location. But when compilation of C# code is needed we have dotnet-pkg to help.