It is possible to configure git to use a extra helpful git message when inside the git commit editor.
1 2 3 4 5 6 7 8 910111213141516171819
## When committing follow those rules:# 1. Use the Conventional Commits style when committing!# Follow this template:# > <type>[optional scope]: <description># ># > [optional body]# ># > [optional footer(s)]# Allowed commit types are:# fix, feat, build,# chore, ci, docs,# style, refactor, perf,# test.# See also: https://www.conventionalcommits.org/en/v1.0.0/# 2. Remember to add a "Signed-off-by"!# For example:# > Signed-off-by: John Smith <js@js.org>#
get-module-content for showing module implementation
Normally Scribble, the Racket’s documentation tool, does not provide a way to see how a function/object/module is actually defined in the code. Just recently I wound a good-enough way to insert the whole content of the module we are documenting with Scribble.
The input is a module name in the form that you would use in absolute require form, except that it is a string, not a bare syntax.
get-module-content will reach out to Your Racket package database and find a module that you gave. It will read it and remove all comments. It returns a Racket string.
The string? returned by get-module-content can later be used to either extract some more info but it can be effectively used to insert the full module implementation block.
get-module-content usage inside Scribble
In Scribble I insert the module source code like so:
To solve the repository layout problem we propose this hierarchy:
separate the code from text/prose by clear distinction on top-level — thus the code dir
for code we create this structure:
authoring — authoring scripts for developers
copyright — copyright documents for the code
integration — integration scripts, ie CI/CD scripts or Groovy sources for Jenkins
source — versioned application/library sources, each major version is assigned a v<MAJOR> directory; this allows us to keep and maintain multiple versions, it is very reminiscent to having multiple package versions in a Ports (FreeBSD/Gentoo) repository
for the v<MAJOR> dirs we separate each bag of sources or scripts into its own directory, for example:
F# is a amazing functional language bridging C#/.NET ecosystem with OCaml and interactive programming. It has recently became by favorite language to create personal projects in. It both has additional security of strong typing, unlike Python or Ruby while keeping the functional and interactive properties of weak-typed languages. F# is truly a engineering marvel.
PowerShell 7 is the Open-Source implementation of the old Windows PowerShell that is also cross-platform and can be used for scripting and automation. It’s Object-orientation makes an amazing extension capability compared to Bash.
You can use the F# language to create PowerShell modules. Normally PS Modules are written in C# but since the interop between .NET languages is insanely fluent one can just swap C# for F#.
We then need to create the main manifest file fs-example.psd1.
Path - relative path to output the manifest,
RootModule - relative module path to load on module import,
ModuleVersion, Description, Author and Copyright are some of standard metadata fields,
AliasesToExport, CmdletsToExport, DscResourcesToExport, FunctionsToExport and VariablesToExport are either globs or lists that tell what functions will be available on module load, for simplicity we will just specify a glob expression '*'.
123456
New-ModuleManifest-Path./fs-example.psd1-RootModule./fs-example.psm1`-ModuleVersion"1.0.0"`-Description"FSharp example module"`-Author"Me"-Copyright"Copyright (c) 2025, Me"`-AliasesToExport'*'-CmdletsToExport'*'`-DscResourcesToExport'*'-FunctionsToExport'*'-VariablesToExport'*'
Copying PowerShell assets
Following ItemGroup will copy all files from PSModuleAssets to the output directory:
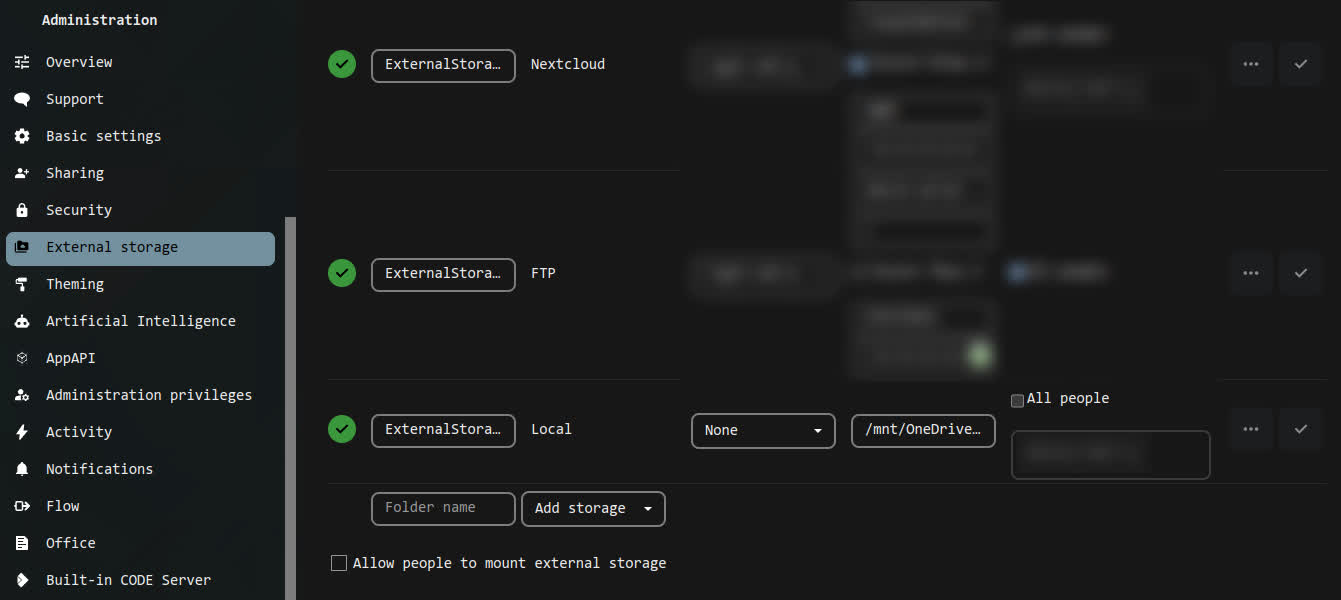
There will be a FUSE OneDrive filesystem mounted on the machine Nextcloud runs on,
You configure filesystem-local “External storage” and point to the mountpoint of a cloud drive (in this case OneDrive),
users connected via Nextcloud Client will have a option to sync any chosen files from the External storage as if they were Nextcloud-owned files.
Benefits
There are some benefits from connecting OneDrive to Nextcloud:
faster cached sync than by normal straight-to OneDrive connection - files will be pushed to Nextcloud and then uploaded to Nextcloud, this will take less time than uploading straight to OneDrive because of Microsoft OneDrive rate-limiting the uploads (especially in case of larger files),
clients of Nextcloud do not have to configure any OneDrive connection,
you will be able to have two-way sync of your OneDrive files (currently two-way sync on the RClone side is experimental, this will use Nextcloud’s two-way sync mechanism).
Set up RClone
First You will have to set up RClone. Connect to your cloud of choice and then copy the config to a location that will be readable by a service that mounts a given cloud drive.
For OneDrive I use /usr/local/share/rclone/config/rclone.conf that is accessible only to the apache user.
The config will look something like this:
123456
[OneDrive]
type = onedrive
region = global
token = *REDACTED*
drive_id = *REDACTED*
drive_type = personal
Mounting OneDrive
I created this helper script (in /usr/local/bin/rclone-mount.sh):
#!/sbin/openrc-runconf_path="/usr/local/share/rclone/config/rclone.conf"cloud_name="OneDrive"cloud_path="/"local_user="apache"local_path="/mnt/${cloud_name}"command="/usr/local/bin/rclone-mount.sh"command_args="${conf_path}${local_user}${local_path}${cloud_name}${cloud_path}"command_background="false"command_user="${local_user}:$(id-g-n${local_user})"supervisor="supervise-daemon"
depend(){neednet
}
start_pre(){ebegin"Unmounting leftovers from ${local_path} before service start"umount"${local_path}"eend0}
stop_post(){ebegin"Unmounting leftovers from ${local_path} after service stop"umount"${local_path}"eend0}
RClone mounts cloud drives by using FUSE. To have the RClone option --allow-other available in order to allow root to access the drive you will have to modify the FUSE config file (/etc/fuse.conf) - add user_allow_other.
Nextcloud configuration
Download and enable the “External storage” app. Then, in “Administration” settings add a external storage:
The official ::gentoo repository currently contains only GHC on version 9.2.8. To install newer GHC one has to either download/build themselves or use the ::haskell overlay (https://github.com/gentoo-haskell/gentoo-haskell).
Build of GHC 9.8 takes around ~2 hours on a 8-core laptop-grade CPU.
Bonus: masking packages from ::haskell
If you want to exclude a given version from the ::haskell overly from being installed/updated, then you can add a similar line(s) to /etc/portage/package.mask/0000_hs.conf:
By default (on Gentoo): * sa (the collector) saves statistics to /var/log/sa, * /etc/sysstat is the configuration file * cron jobs are run via the *system* cronjob table.
There were so many times when I wanted to use some package, it has a version on repology, but when I open the project’s repo there are no tags.
Nowadays it is extremely easy to bump software versions according to semantic versioning and also to tag them, that it should go without saying that most OSS and proprietary projects could also follow that workflow.
There are many projects both language-specific and agnostic to manage the release (and tagging) process. My favorite agnostic one is tbump and I highly recommend it.
I made a mistake when splitting my Portage make.conf file, having it as one file instead of a directly with many small files is a lot easier to maintain.
Portage allows users to split all of files inside /etc/portage such as make.conf, package.use, package.mask and other into groups of files contained in directories of the same name. This is very helpful when using automation to add some wanted configuration. But in case of make.conf it becomes a “form over function” issue.
I would also recommend to keep make.conf as simple as possible, without useless overrides and variable reassignment.
The most important value of #Gentoo is configuration/customization and reproducibility comes 2nd.
In case of NixOS those value are reversed. The most important to NixOS is ability to reproduce given setup.
Both of those systems will suit users that value control over their systems very highly (unlike, say, Ubuntu - where the most important value is convenience), but the tie-breaking is between what value out of those two should come 1st.